Art with Mrs. Peroddy
  • Home
  • About Me
  • School Blog
  • Fun Art Sites
  • Contact Me

1 Point Perspective Names

5/10/2013

0 Comments

 
Picture
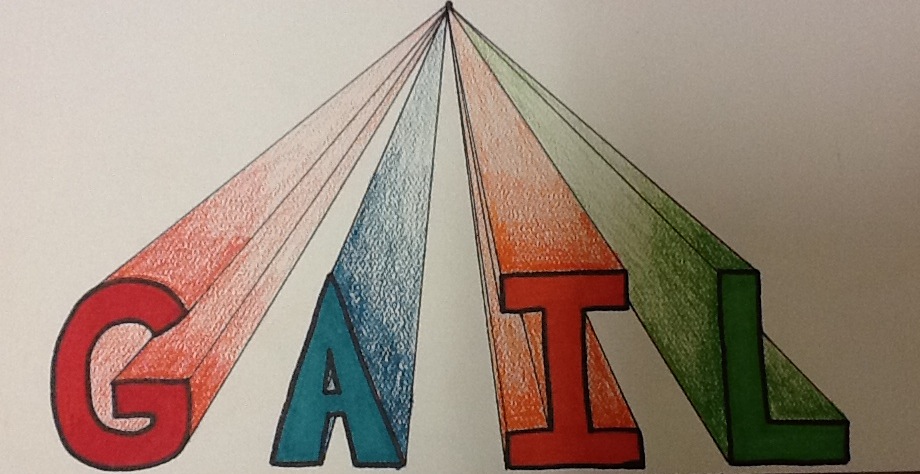
The 4th graders have started to make their names look 3-Dimensional by using 1-Point Perspective.

I start by having the students draw their name in BOX letters, outlining it with black sharpie markers and then coloring it in too.

Then they draw a vanishing point. This point is where all of the lines will disappear to. All corners, unless they run into their letter right away, are connected. If the eventually run into a letter, they stop.
They first draw in pencil and the outline the lines with sharpie pen.

They complete this lesson by using colored pencil and showing VALUE. Value is the light and dark of a color.
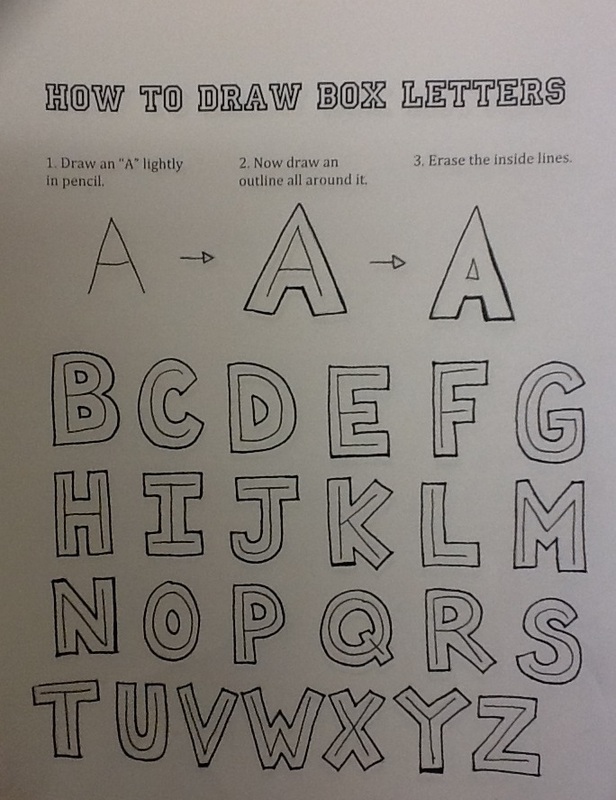

Picture
Box Letter Handout
0 Comments

Birch Trees

5/2/2013

0 Comments

 
PictureFinished Birch Tree Landscape
4th Graders are finishing up creating a birch tree landscape. They started this lesson by using masking tape to create the trees. Their goal was to make a realistic looking landscape using foreground, middle ground and background. They needed to place the correct size trees in the correct places - small trees in the background, medium size trees in the middle ground and large trees in the foreground.
Students will then paint their ground with browns and greens to create a darker ground. The sky is painted with brighter colors. They paint over the masking tape trees.
Students will also add shadows to each of their trees.
Once the paint is dry, they peel off their masking tape to reveal a perfectly white tree - A Birch Tree! Then they add horizontal lines using a black sharpie pen.


Picture
Beginning to paint
We also talk about the importance of birch trees to the Native American Tribe, The Ojibwe. The Ojibwe use the birch bark to make Canoes, Containers and Wigwams.
0 Comments

Stained Glass Radial Symmetry

5/2/2013

1 Comment

 
Picture
The 3rd grade is just finishing up this lesson on Radial Symmetry. In their classroom, they learned about symmetry so we are taking that information and using it in art.
I recently got all this projector paper from the Media Specialist and this was the perfect lesson for it!


Picture
Picture
1. The students first trace a circle and split the circle into 8 equal parts using a black sharpie marker.
2. Then they cut out a paper triangle that would fit into each section of the circle.
3. They create a design using shapes, lines and their name, if they want.
4. They then tape this triangle to the back of the paper and trace this triangle over and over again.
5. They color first with sharpie colors and then out line everything.

1 Comment

    Categories

    All
    3rd Grade
    4th Grade
    5th Grade
    Artwork
    Displays
    Project Ideas
    Videos

    Gail Peroddy

    I'm in my 6th year teaching art in Becker, MN. Time has really flown by! Wowza!

    Archives

    April 2016
    February 2016
    January 2016
    December 2015
    November 2015
    October 2015
    April 2015
    March 2015
    February 2015
    January 2015
    December 2014
    November 2014
    October 2014
    September 2014
    August 2014
    May 2014
    March 2014
    February 2014
    January 2014
    November 2013
    October 2013
    June 2013
    May 2013
    March 2013
    February 2013
    January 2013
    December 2012
    November 2012
    October 2012
    September 2012
    August 2012
    June 2012
    May 2012
    April 2012
    March 2012
    February 2012
    January 2012
    December 2011
    November 2011
    October 2011
    September 2011

    RSS Feed

Powered by Create your own unique website with customizable templates.